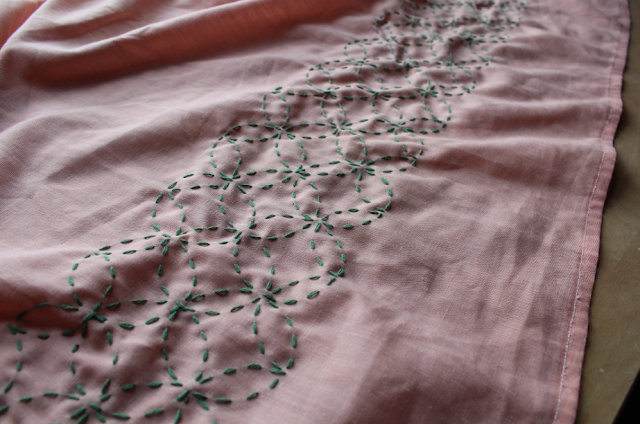
I found an apron in a charity shop not long ago for £1 and purchased it thinking it would be perfect to put some stitching on, this tutorial will show you the Sashiko stitch known as 'Shippo tsunagi' (linked seven treasures).
You will need;
the garment or fabric you are stitching on,
compass,
ruler,
pencil or fabric pen/pencil,
scissors,
thread suitable for the thickness of materials you are using,
needle,
cardboard (cereal box or something from your recycling)
step 1,
step 2,
creating a grid
make sure when you begin you draw your grid on the inside of the garment (the side not seen when worn)
measure 4 inches up from the hem along the full length of the garment and make pencil marks, this is so when you draw the first line across you know that the bottom of the pattern is the same distance from the bottom of the apron all the way along.
step 3,
then measure 4 inches up from the first line you have drawn across the full length of the apron, and leave pencil marks at 1 inch intervals. When you have measured all the way along join the pencil marks up with one long horizontal line. Steps 2 and 3 will give you the frame of the design in which you will now draw a grid.
step 4,
this involves measuring along the lines and at 1 inch intervals leaving a dot, you then join all the lines meeting the dots up together vertically- you have created a grid and this is the basis for the not only this stitch but other Sashiko stitches too.
step 5,
using the cardboard, compass and pencil draw a circle with a radius of 1 inch (or as appropriate if you have changed the measurements for your garment) and cut it out
step 6,
using the circle to draw around as your template place it at the top right corner of the grid and draw a circle in every 4 squares until you have travelled the full length of the garment.
step 7,
you then need to draw around the circle moving it one square along and one square down so that the circles overlap,
so... place the circle template on the middle two squares making sure it is moved one to the left for the first circle and carry on drawing a circle in the middle two boxes all the way along the grid as shown in the photograph below
step 8,
you now need to place the template below the circles that have just been drawn and finish the pattern with a half circle. (If the grid had been bigger there may have been room to create another full circle but on this grid in order to complete the design half circles are drawn).
step 9,
now the grid is drawn you are ready to start stitching so ready you needle and thread, double up your thread and use a basic knot to secure the thread at the beginning of stitching and again to secure the thread at the end of stitching
step 10,
this design is not stitched per circle, it is actually stitched in a long line and therefore makes it slightly quicker to stitch than you may have anticipated.
using the image below as a guide, follow the pattern and when you have reached the end turn around and come back the way that you have just stitched but on the line that is not stitched yet so you can complete the pattern.
when stitching you may find that sometimes your stitch crosses over an existing stitch, it is important that you make sure that you cross the thread over on the side that is not going to be visible leaving the front of the garment free from any knots or cross-overs. Remember; the side that is not going to be seen is the side that you have drawn your grid on.
step 11,
continue this until you have completed your design
step 12,
I also added a small running stitch to the waist-band of the apron to complete the design
Finished - enjoy!!


your hand stitche made the apron so
ReplyDeletecharming and original, unique only one
item in whole world.
very cute result helen.
thank you for your comment Coco
Delete